

Add a user
- Open the main menu, expand Administration, then select User Accounts.
- Select New User.
- Enter the required First Name, Last Name, and Email. Choose an Admin User Role if needed.
- Choose the required Catalog Access and Bulk Upload Access settings.
- Select Create when the required fields are complete.
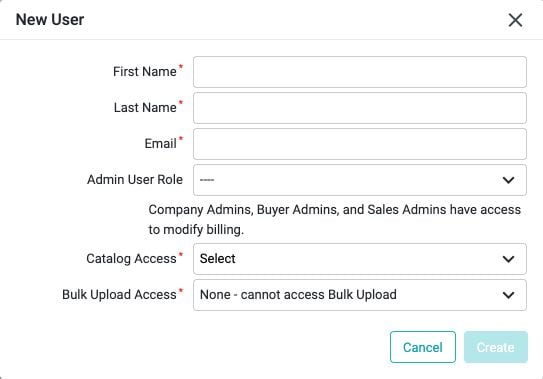
After creating the account, return to the user list to find it and review its status. Ask your administrator how new users complete sign-in.
Choose a role and access
The Admin User Role menu includes these roles:
| Role option |
|---|
| Company Admin |
| Buyer Admin |
| Sales Admin |
| Buyer/Seller Admin |
The form states that Company Admins, Buyer Admins, and Sales Admins can modify billing. Detailed Catalog, Bulk Upload, customer, buyer, and AI Knowledge settings are reviewed separately.
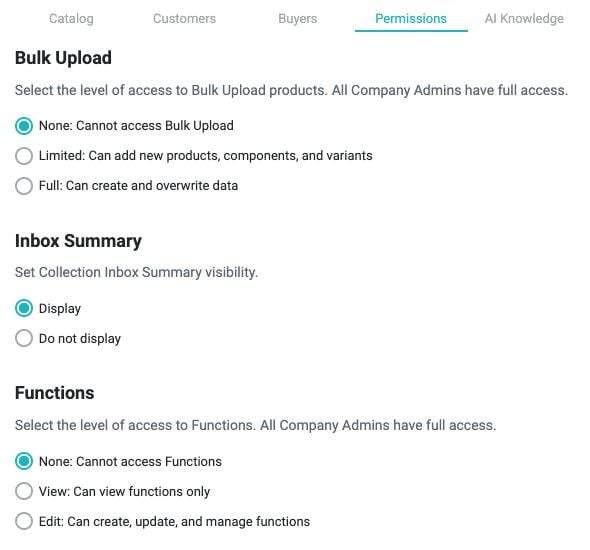
Choose Catalog Access if that control is shown, and set the required Bulk Upload Access. If Marketplace Access appears for your company, choose one of its required options. In a user’s Permissions tab, Bulk Upload access has three choices:
- None: Cannot access Bulk Upload.
- Limited: Can add new products, components, and variants.
- Full: Can create and overwrite data. Company Admins have full access.
Find a user and change permissions
- In User Accounts, search for the person or select them from the list.
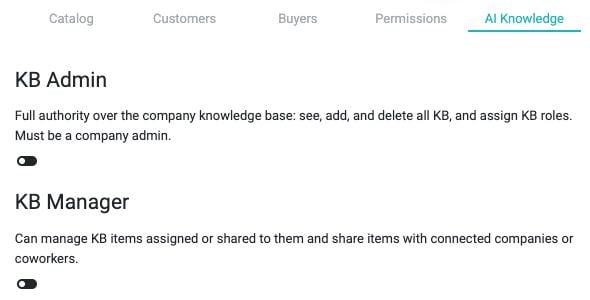
- Open the user’s details and choose a tab to review its access settings. Tabs may include Catalog, Customers, Buyers, Permissions, and AI Knowledge.
- In Permissions, review the available controls, including Bulk Upload, Inbox Summary, and Functions. For Bulk Upload, choose None, Limited, or Full as appropriate.
- Use the Catalog, Customers, and Buyers tabs to review the controls available for that user and account.
Company permissions and AI Knowledge roles are managed in separate tabs.
Deactivate or reactivate a user
To deactivate an active user, open the action menu beside the user, choose Deactivate Account, and follow the confirmation prompt. To reactivate a deactivated user, open that user’s action menu and choose Activate Account. Activation may depend on available seats.
Billing for user accounts
Adding or activating a user may depend on available seats and your company’s plan. Billing details depend on your account contract. The Billing page may show active seats, ongoing usage, current-period usage, and billable products. Review the Billing page for the details available to your account.
For questions about your contract or plan, use the Surefront support link on the Billing page.
